 Continuing in a Series
This time, we continue discussing Exercise No. 3: Moving the Ribcage and briefly introduce Exercise No. 4: Hip Control. In the next few installments, Les Vogt takes you through exercises of his Five Easy Pieces. When you’ve mastered them, you should be able to put any part of your horse’s body where you want it, without resistance.
The Brace Rein
Remember how you used your rein to move the horse’s shoulders? First making light contact for the bend, then lifting your hand and moving it over to direct the shoulders?
When would we use the brace rein? We’ll use it in Exercises 3 and 4, which we’ll start in this lesson, and after that, mainly for lope departures and lead changes. In Exercise No. 4: Hip Control, when you want to move your horse’s hips to the right, you will use a brace rein to make sure his shoulders stay to the left or at least straight, so that you isolate only the hip with the movement. If you’re not effective at keeping the shoulders out of the way with your brace rein when you use your leg in the back, or hip, position, the energy will most likely come out of the shoulders instead.
As we start to move the hips and ribs, learning to keep the shoulders out of the way while keeping life in your hands will take a little practice–but the better you get it here–the easier you’ll get along when we progress to the correct lope departures and lead changes.
Rib Cage Control
Being able to move the horse’s rib cage has lots of benefits. For one, if you get a little resistance in the horse’s mouth, when you ask him to give laterally, you can help create the bend in his body by pushing his ribs over. This can be especially helpful when riding with one hand. Rather than having to bump the horse straight back, you can work at softening him back and forth between your legs. You can push the ribs out to increase the size of your circles.

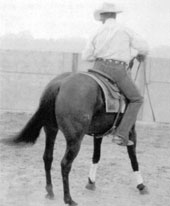
In this picture my horse is doing Exercise No. 3: Moving the Ribcage. Notice how straight she is from head to tail! Make sure your horse does not lead with the shoulders.
Why is this so critical for lead changes? Because if you can get a horse to change leads with his back leg first as a result of good hip control, the front legs will change automatically. But if your cue results in him changing in front first, he will often go a few strides before he changes in back, if he does at all–and that will kill your reining score.
So to start Exercise No. 3, I want you to walk up to the fence so that you’re facing it. If you were going to move to the right, you’d start by making light contact with the right rein so it acts as a brace rein to hold your horse’s shoulders, then start bumping him with your left leg in the center position. Your goal is for him to start crossing over with both front and back legs at the same time, and if you get one step, stop and praise him.
If you get a step with back legs first, and then he catches up with the front–that’s acceptable, too–as long as you keep working toward both front and back crossing together. What is not acceptable is for him to lead with his front legs. To keep him from doing that, you need to stay active and assertive with that bracing rein.
Although this might be a bit of work at first, the horse will eventually understand the concept and start moving both sets of legs at once when he feels your leg cue in the center position.
Next time, we’ll go further into Exercise No. 4: Moving the Hips.
Editor’s Note: More with Les is a regular California Horsetrader column. Les Vogt has won more than 15 World Championships, including two wins at the NRCHA Snaffle Bit Futurity. Although Les still rides and occasionally shows, his focus is giving clinics around the world and developing products for the performance horseman. To learn more about Les and to see his clinic schedule, visit: www.lesvogt.com
Leave a Comment
All fields must be filled in to leave a message.